Migrate Check Point Firewall to Secure Firewall Threat Defense with the Firewall Migration Tool in Security Cloud Control
You can migrate your Check Point Firewall configurations to threat defense either by manually extracting the configuration from your firewall or using the configuration extractor that comes inbuilt with the migration tool. To know the Check Point configurations that are supported, see Check Point Configuration Support .
Select Source Configuration
In the Source Firewall Vendor drop-down, choose Check Point (r80-r81) or Check Point (r75-r77) based on the firewall version you want to migrate. You can manually upload an extracted firewall configuration using Manual Configuration Upload or use the Live Connect option to connect to the Check Point Security Gateway to export the configuration file.
Note | You can use Live Connect only when you have selected Check Point (r80-81) and Configuration Extractor only when you have selected Check Point (r75-r77). |
Select Target
In the Select Target page, the Cloud-Delivered Firewall Management Center provisioned on your Security Cloud Control tenant is selected by default, and the Firewall Threat Defense devices managed by that management center are listed. You can choose the Firewall Threat Defense device you wish to migrate the configuration to, and proceed with the migration.
Note that the threat defense devices listed are displayed either as In Use or Available based on whether the device is being used in another migration instance. However, you can perform an override by clicking Change Device Status , selecting the device from the In Use list, and clicking Continue , which will make the device available for being selected as the target. Choosing Proceed without FTD pushes only NAT objects, ACLs, and port objects to the Cloud-Delivered Firewall Management Center . For more information about the commonly used ASA features and their equivalent threat defense features, see Cisco Secure Firewall ASA to Threat Defense Feature Mapping guide.
Caution | Changing the device status from In Use to Available impacts the ongoing migration instance that is using the device already. We recommend that you exercise caution when doing this. |
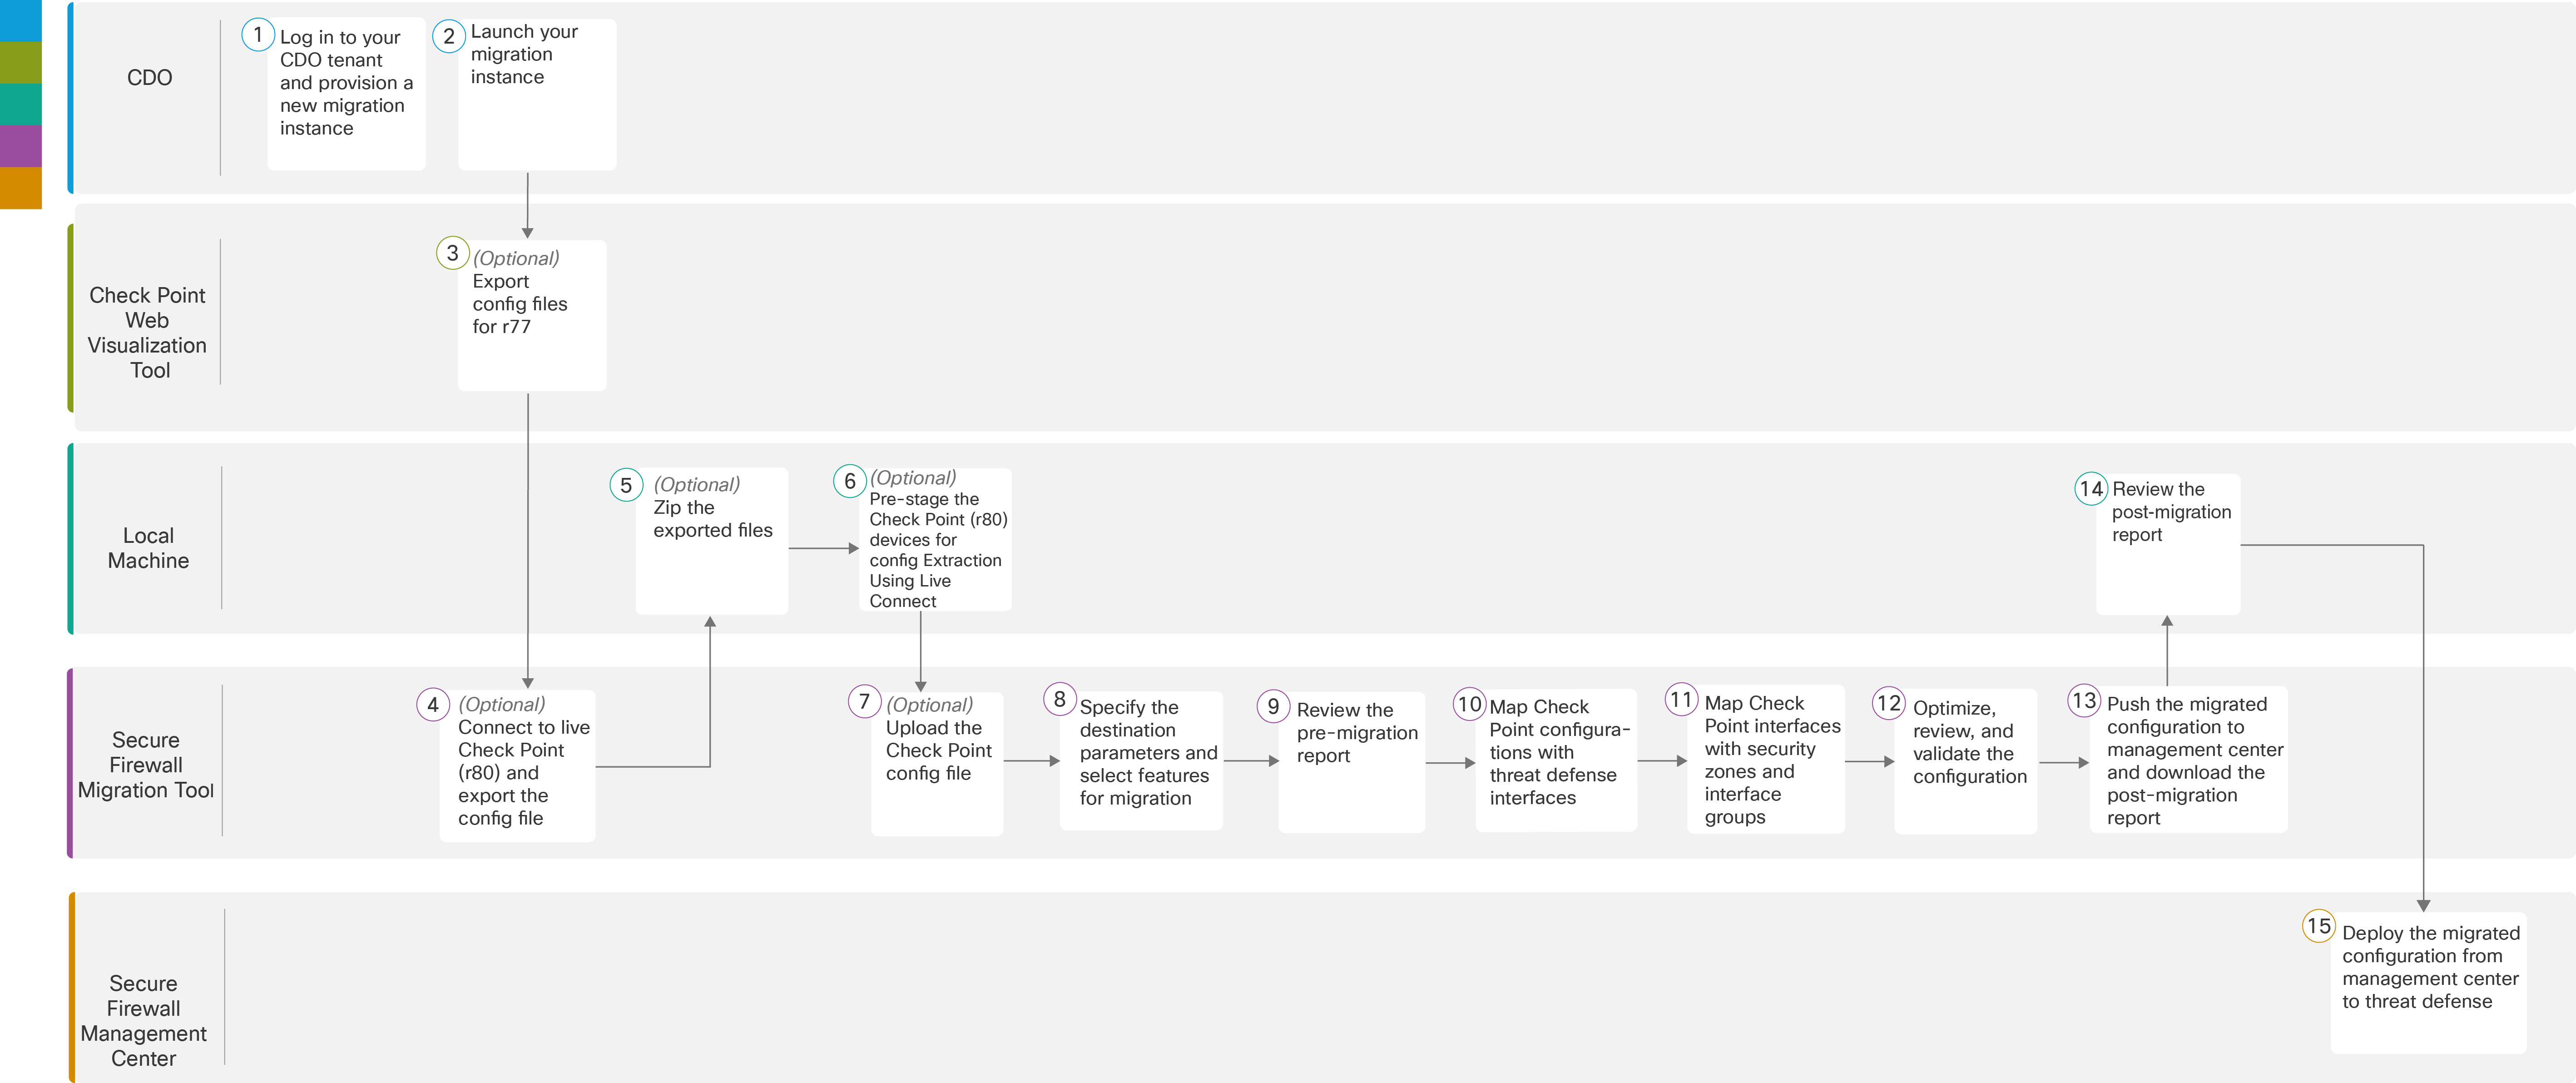
To perform the migration with more detailed steps, continue to Export the Check Point Configuration Files in Migrating Check Point Firewall to Secure Firewall Threat Defense with the Migration Tool book.
|
Workspace |
Steps |
|
|---|---|---|
|
|
Security Cloud Control |
Log in to your
Security Cloud Control
tenant, and in the left pane, click
and click the blue plus
|

|
Security Cloud Control |
Launch your migration instance from Security Cloud Control and choose Check Point (r75–r77) or Check Point (r80–r81) in the Source Firewall Vendor drop-down, based on your requirement. |
|
|
Check Point Web Visualization Tool |
(Optional) Export the Check Point configuration file for r77: To export the Check Point configuration files for r77, see Export the Check Point Configuration Files for r77 . If you intend to export configuration files for r80 using Secure Firewall migration tool live connect feature, skip to step 6. |
|
|
Secure Firewall Migration Tool |
(Optional) Connect to live Check Point (r80) and export the config file: To export the Check Point configuration files for r80 using live connect feature, see Export the Check Point Configuration Files for r80 . |
|
|
Local Machine |
(Optional) Zip the exported files: select all the exported configuration files for r77 and compress them to a zip file. For detailed steps, see Zip the Exported Files . |
|
|
Local Machine |
Pre-stage the Check Point (r80) devices for config extraction: You must configure the credentials on Check Point (r80) devices before using Live Connect. For pre-staging credentials on Check Point (r80) devices, see Pre-Stage the Check Point Devices for Configuration Extraction Using Live Connect . This step is required only if you are planning to migrate configuration files for r80 devices. |
|
|
Secure Firewall Migration Tool |
(Optional) Upload the Check Point config file . |

|
Secure Firewall Migration Tool |
Specify the destination parameters for the Secure Firewall Migration Tool. |
|
|
Secure Firewall Migration Tool |
Navigate to where you downloaded the pre-migration report and review the report. |
|
|
Secure Firewall Migration Tool |
The Secure Firewall migration tool allows you to map the Check Point configuration with threat defense interfaces. For detailed steps, see Map Check Point Configurations with Secure Firewall Device Manager Threat Defense Interfaces . |
|
|
Secure Firewall Migration Tool |
To ensure that the Check Point configuration is migrated correctly, map the Check Point interfaces to the appropriate threat defense interface objects, security zones, and interface groups. For more information, see Map Check Point Interfaces to Security Zones and Interface Groups . |
|
|
Secure Firewall Migration Tool |
Optimize and review the configuration carefully and validate that it is correct and matches how you want to configure the threat defense device. For detailed steps, see Optimize, Review and Validate the Configuration to be Migrated . |
|
|
Secure Firewall Migration Tool |
This step in the migration process sends the migrated configuration to the Cloud-Delivered Firewall Management Center and allows you to download the post-migration report. |
|
|
Local Machine |
Navigate to where you downloaded the post migration report and review the report. For detailed steps, see Review the Post-Migration Report and Complete the Migration . |
|
|
Cloud-Delivered Firewall Management Center |
Deploy the migrated configuration from the Cloud-Delivered Firewall Management Center to threat defense. |

 button to start provisioning a new migration instance.


