Migrate Firewall Threat Defense to Cloud-Delivered Firewall Management Center

This task migrates Firewall Threat Defense devices from an on-premises Firewall Management Center to cloud management, enabling centralized cloud-based device management and policy deployment.

Migration transfers device management from on-premises infrastructure to cloud services while preserving existing configurations and policies. The process includes automatic VPN peer device selection and provides options for policy review and deployment timing.

Before you begin

Confirm FMC and FTD versions, disk space, DNS, outbound access, device synchronization, topology peers, and backup. See prerequisites for migrating and supported software versions.

Follow these steps to migrate Firewall Threat Defense devices to cloud management:

Procedure


Step 1

In the navigation bar on the left, click Administration > Migration > Migrate FTD to cdFMC.

Step 2

Click The image illustrates the steps involved in migrating Firewall Threat Defense devices to cloud management, emphasizing the requirement to initiate only one migration job at a time. and choose On-Prem FMC-managed FTD to Cloud-Delivered Firewall Management Center.

Note
You can initiate only one migration job at one time.

Step 3

In the Select On-Prem FMC area, perform these actions:

  1. You can click the Onboard an FMC link to onboard the On-Premises Firewall Management Center if you have not done already. See Onboard an FMC.

  2. Select the On-Premises Firewall Management Center from the available list and click Next.

In the Select Devices step, you will see the Firewall Threat Defense devices that the selected On-Premises Firewall Management Center manages. If a high-availability pair is set up on the on-premise On-Premises Firewall Management Center, the high availability node will be shown instead of the active and standby devices.

The Last Synced time field indicates the time that is elapsed since the device configuration is synchronized into the On-Premises Firewall Management Center. You can click Sync from OnPrem FMC now to fetch the latest device changes.

Step 4

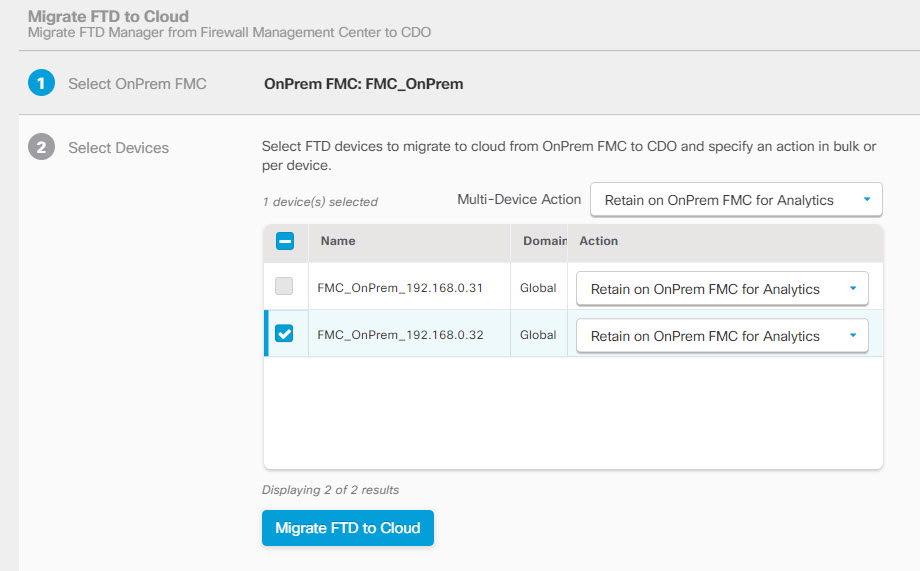
In the Select Devices step, configure device selection and commit actions:

  1. Select the devices that you want to migrate.

    These devices can include standalone, high-availability pairs, or clusters. If you have a high-availability pair or a cluster, select the node that represents it. Also, you can hover your mouse pointer over the cluster to view more details about the control node.

    The image illustrates the selection process for devices in a migration setup, highlighting options for standalone, high-availability pairs, and clusters, along with details on unsupported versions and devices registered for analytics.
    Note
    • The devices running on unsupported versions are not available for selection.

    • The devices that are registered for analytics only with the On-Premises Firewall Management Center or have pending changes to be deployed are not eligible for migration.

    • When you select a device that is associated with a site-to-site VPN topology, Security Cloud Control automatically selects its peer devices belonging to either the same topology or a different topology, because all devices in the site-to-site VPN topology must be migrated together for a successful migration to take place. The wizard does not list the extranet devices, if any. However, Security Cloud Control migrates extranet devices.

      The S2S VPN Topology column indicates the number of site-to-site VPN topologies in which a selected device participates. You click the topology link to view the topologies and devices that are migrated along with the selected device. This field is not applicable to devices that are not part of the site-to-site VPN topology.

    • A high availability pair is presented as a single node. You must select this node to include active and standby devices in the migration.

  2. In the Multi-Device Action list, you can choose a common action to apply on all devices.

  3. In the Commit Action column, you can choose one of these actions for the selected device:

    • Retain on OnPrem FMC for Analytics: After the migration process is completed, the analytics management for selected Firewall Threat Defense devices is retained on the On-Premises Firewall Management Center.

    • Delete FTD from OnPrem FMC: After the migration process is completed, the selected devices are removed from the On-Premises Firewall Management Center and are available for Security Cloud Control to handle the analytics. You must configure the devices to send events to Security Cloud Control for managing analytics. When the devices are deleted from the On-Premises Firewall Management Center, they cannot be revoked.

      Note

      For the On-Premises Firewall Management Center 1000/2500/4500, when you select devices to migrate, make sure you choose Delete FTD from OnPrem FMC. Note that the device is not fully deleted unless you commit the changes or 14 days pass.

Note

The actions that are specified here are committed automatically after the 14 days evaluation period or after the changes are committed manually.

Step 5

(Optional) Check the Pause migration to review imported shared policies check box.

When you enable this option, the migration process will pause after the shared access policies like Access Control and NAT policies are staged in the Cloud-Delivered Firewall Management Center. This pause ensures that the evaluation doesn't start and that the device's current state and manager remain unaffected. It gives you ample time to review the imported configuration for accuracy. After you've assessed everything, you can resume the migration during the planned migration interval, which will then kick off the 15-day evaluation period.

Step 6

Check the Auto deploy to FTDs after successful migration check box to deploy the migrated configuration automatically to the device after successfully migrating and registering the device with the Cloud-Delivered Firewall Management Center.

However, if you prefer to review and manually deploy the configuration from the Cloud-Delivered Firewall Management Center after successful migration, you can uncheck this option and proceed to the next step.

Note

Perform the migration during a maintenance window. If you check Auto deploy to FTDs after successful migration, the migrated policies are deployed to the devices as soon as migration succeeds, which can disrupt traffic.

If you leave this option unchecked, deploy the policies manually during the maintenance window. Do not perform any modification until you finish successful first deployment after migration. Deploying the migrated policies promptly also helps reduce the risk that configuration operations during the evaluation period will cause later commits to fail.

Step 7

Click Migrate FTD to cdFMC.

Step 8

Click View Migration to Cloud Progress to see the progress.

What to do next:

If you selected Pause migration to review imported shared policies, Security Cloud Control pauses after staging shared policies such as access control and NAT. The job does not start evaluation or change the device manager at that point. You must manually click Proceed Migration to import the remaining configuration. See Proceed migration process.

You can view the overall and individual status of migration jobs and generate a report when a job is completed successfully. See Review and manage Firewall Threat Defense migration job.


The migration job begins and transfers device management from the on-premises FMC to cloud management. You can monitor progress through the migration status interface and receive notifications when the process completes successfully.