Workflow and Prerequisites to Onboard the FDM-Managed Device Using Zero-Touch Provisioning
Zero-Touch Provisioning is a feature that allows a new factory-shipped Firepower 1000, Firepower 2100, or Secure Firewall 3100 series device to be provisioned and configured automatically, eliminating most of the manual tasks involved with onboarding the device to Security Cloud Control. The zero-touch provisioning is intended for remote offices or other locations where your employees are less experienced working with networking devices.
To use the zero-touch provisioning process, you must onboard the device to Security Cloud Control, connect it to a network that can reach the internet, and power on the device. See Onboard a Configured FDM-Managed Device using the Device's Serial Number for more information.
Note | You can power-on the device before or after onboarding it to Security Cloud Control. We recommend that you onboard the device to Security Cloud Control first and power-on the device and connect it to your branch network second. When you onboard the device in Security Cloud Control, the device is associated with your Security Cloud Control tenant in the Cisco cloud and Security Cloud Control automatically syncs the device configuration. |
You can also use this procedure to onboard a device purchased from an external vendor or onboard a device already managed by another cloud tenant in a different region. However, if the device is already registered to the external vendor's cloud tenant or a cloud tenant in a different region, Security Cloud Control doesn't onboard the device but displays the "Device serial number already claimed" error message. In such cases, the Security Cloud Control admin must unregister the device's serial number from its previous cloud tenant and then claim the Security Cloud Control device in their own tenant. See Device Serial Number Already Claimed in the troubleshooting chapter.
The device Connectivity status changes to "Online" and the Configuration status changes to "Synced". The FDM-managed device is onboarded to Security Cloud Control.
You can see the Status LED (Firepower 1010), SYS LED (Firepower 2100), or S LED Secure Firewall 3100) flashing green on the rear panel of the hardware. The device LED continues to flash in green when it's connected to the cloud. If the device can't connect to the Cisco cloud or loses its connectivity after being connected, you can see the Status LED (Firepower 1010), SYS LED (Firepower 2100), or M LED (Secure Firewall 3100) flashing alternate green and amber.
See this video: Installing Your Cisco Firepower Firewall Using Zero-Touch Provisioning video to understand the LED indicators.
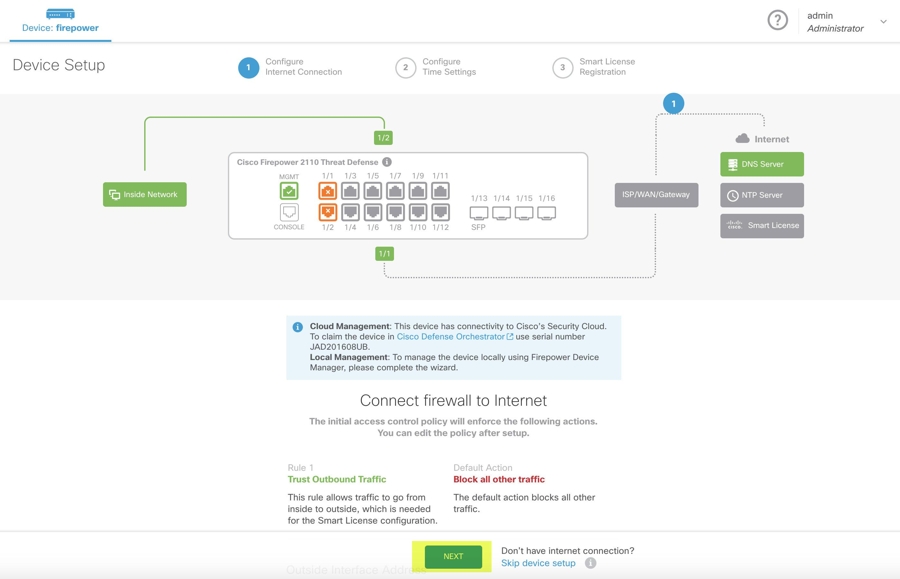
Important | If you have logged into the FDM-managed device console, SSH, or Secure Firewall Threat Defense, you would have changed the device's password during your first login. You can still use the zero-touch provisioning process for onboarding the device using Security Cloud Control. After you log into Secure Firewall Threat Defense, ensure that you do not complete the device setup wizard step that configures the outside interface. If you complete this step, the device is unregistered from the cloud, and you cannot use the zero-touch provisioning process. |
When you log into Secure Firewall Threat Defense, you will see the following screen on the dashboard.

Without proceeding further on the Secure Firewall Threat Defense UI, go to the serial number onboarding wizard and onboard the device. Here, you must select Default Password Changed because the device password has already been changed.
Prerequisites
Software and Hardware Requirements
The FDM-managed devices must be running software that supports serial-number-onboarding. Use the following table as a guide:
| Firewall Model Numbers that Support Zero-Touch Provisioning |
Supported Firewall Software Version |
Software Package |
|---|---|---|
|
Firepower 1000 series device models: 1010, 1120, 1140, 1150 |
6.7 or later |
SF-F1K-TDx.x-K9 |
|
Firepower 2100 series device models: 2110, 2120, 2130, 2140 |
6.7 or later |
SF-F2K-TDx.x-K9 |
|
Secure Firewall 3100 series device models: 3110, 3120, 3130, 3140 |
7.1 or later |
SF-F3K-TDx.x-K9 |
Configuration Prerequisites for Hardware Installation
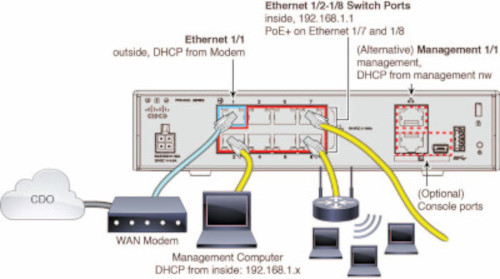
The network at the branch office cannot use the 192.168.1.0/24 address space. The network on Ethernet 1/1 (outside) cannot use the 192.168.1.0/24 address space. The default IP address of the Ethernet 1/2 "inside" interface on the 1000 and 2100 series devices running FDM 6.7 is 192.168.1.1 may conflict with the DHCP address allocated by your WAN modem if it's on that subnet.
-
inside - Ethernet 1/2, IP address 192.168.1.1
-
outside - Ethernet 1/1, IP address from DHCP or an address you specify during setup

-
-
The threat defense device must be installed and connected to the Cisco Cloud.
-
The outside or management interface of the device must be connected to a network providing DHCP addressing. Typically, the device has a default DHCP client on the outside or management interface.
NoteIf the management interface is connected to a network having a DHCP server, it takes precedence over the outside interface for Linux stack initiated traffic.
-
Your outside or management interface needs to access to be able to access the following Security Services Exchange domains for the serial onboarding method.
-
Australia Region
-
api.aus.sse.itd.cisco.com
-
est.sco.cisco.com (common across geographies)
-
mx*.aus.sse.itd.cisco.com (currently only mx01.aus.sse.itd.cisco.com)
-
dex.aus.sse.itd.cisco.com (for customer success)
-
eventing-ingest.aus.sse.itd.cisco.com (for CTR and Security Cloud Control)
-
registration.aus.sse.itd.cisco.com (allows for device registration to the regional Cisco cloud)
-
-
APJ Region
-
api.apj.sse.itd.cisco.com
-
est.sco.cisco.com (common across geographies)
-
mx*.apj.sse.itd.cisco.com (currently only mx01.apj.sse.itd.cisco.com)
-
dex.apj.sse.itd.cisco.com (for customer success)
-
eventing-ingest.apj.sse.itd.cisco.com (for CTR and Security Cloud Control)
-
registration.apj.sse.itd.cisco.com (allows for device registration to the regional Cisco cloud)
-
-
EU Region
-
api.eu.sse.itd.cisco.com
-
est.sco.cisco.com (common across geographies)
-
mx*.eu.sse.itd.cisco.com (currently only mx01.eu.sse.itd.cisco.com)
-
dex.eu.sse.itd.cisco.com (for customer success)
-
eventing-ingest.eu.sse.itd.cisco.com (for CTR and Security Cloud Control)
-
registration.eu.sse.itd.cisco.com (allows for device registration to the regional Cisco cloud)
-
-
India Region
-
api.in.sse.itd.cisco.com
-
est.sco.cisco.com (common across geographies)
-
mx*.in.sse.itd.cisco.com (currently only mx01.in.sse.itd.cisco.com)
-
dex.in.sse.itd.cisco.com (for customer success)
-
eventing-ingest.in.sse.itd.cisco.com (for CTR and Security Cloud Control)
-
registration.in.sse.itd.cisco.com (allows for device registration to the regional Cisco cloud)
-
-
US Region
-
api-sse.cisco.com
-
est.sco.cisco.com (common across geographies)
-
mx*.sse.itd.cisco.com (currently only mx01.sse.itd.cisco.com)
-
dex.sse.itd.cisco.com (for customer success)
-
eventing-ingest.sse.itd.cisco.com (for CTR and Security Cloud Control)
-
registration.us.sse.itd.cisco.com (allows for device registration to the regional Cisco cloud)
-
-
-
The outside interface of the device must have DNS access to Cisco Umbrella DNS.
Before Claiming the Device in Security Cloud Control
Before claiming the device in Security Cloud Control, make sure that you have the following information:
-
Chassis serial number or PCA number of the threat defense device. You can find this information on the bottom of the hardware chassis or on the carton box in which your device is delivered. In the following example picture, you can see the serial number "*******X0R9" on the bottom of the Firepower 1010 chassis.

-
The default password of the device.
-
A smart license generated from Cisco Smart Software Manager for using the additional capabilities. However, you can complete the device onboarding using a 90-day evaluation license and later apply the smart license.